


 6
6Great planning and foresight can elevate your video marketing content from good to brilliant.
In this blog, we explore how filmmakers can make creative decisions that save time and effort in the editing room, resulting in a video campaign that engages and delights.
Get the basics right
The most important thing to establish before you start any shoot is your introduction, middle and end. It's obvious, but vital. Planning the touch points in your narrative will help you identify specific shots that need to be secured. Video production can be an expensive endeavour, and you don't want to be faced with the prospect of a re-shoot, especially one caused by mere oversight. So, start with the broad strokes:
Introduction - The purpose of an introduction is to set the tone, raise interest and briefly explain what your video is about. Keep it short and visually engaging.
Middle - The middle of your video is where the action kicks in. These shots are the most important to storyboard.
End - In the end you’ll want to wrap up your thoughts, end on a memorable image and include a compelling CTA (call to action).
Understanding the story arc will ensure you get enough footage to work with. But there’s more to consider! For example: have you recorded the shots you might need to create interesting visual effects as you change scene, like a swipe cut? If you're not sure what I mean, here's a short video about 5 creative camera transitions. These could be simulated in post-production, but would look much better using clever camera movement on set.
It's important to visualise your final product, and capture all the shots you need. Doing so will protect your editor from the frustrating task of patching shots when they could be weaving them together with elegance.
Orient the audience
Make sure that if you change camera position it's still clear where things exist in physical space.
This involves the 180° rule, which asks that characters in a scene maintain the same left/right relationship to each other. Crossing over the 180 line flips this relationship, and causes confusion as to who is standing where.
As shown in the diagram below, the camera's range of movement should generally be restricted to one side of the line.
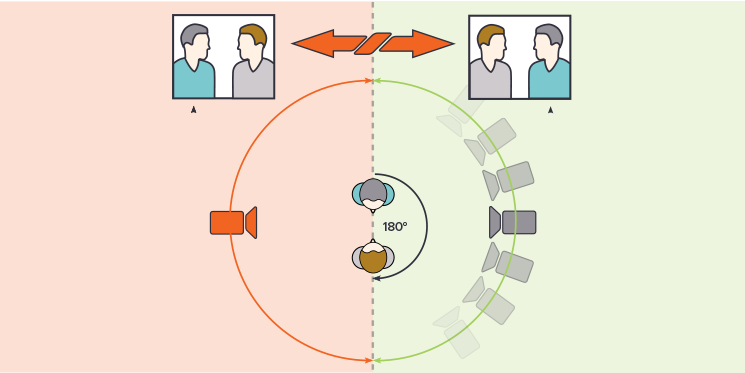
The 180° rule.
When cutting from the green area to the orange area (and vice versa) the characters will appear to switch sides on screen. This is to be avoided.
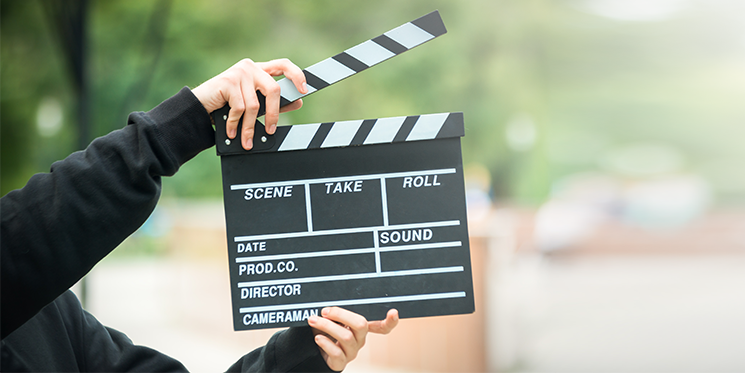
Use visual markers to highlight your best clips
Do you know why they use clapperboards on set? They help to synchronise picture and sound, and to identify different scenes and takes as they are recorded.
You don't really need one unless you're filming a blockbuster. But a simple, obvious visual cue can be used to indicate the production of a good clip. This is extremely helpful practice for editors. Your DIY clapper could be as simple as holding up a piece of paper, giving a thumbs up, or an exaggerated wave of a hand.
Remember, it may be necessary to record the same section of your video multiple times - even with the most carefully scripted video. Perhaps your speaker stumbles on a line, or there's an unplanned disturbance like a police siren in the distance. Visual markers will alert your editor and save them time when sifting through outtakes, narrowing down the decisions they have to make.
Create buffer room between shots
To make editing your shots easier, leave some breathing space between them. This will make transitions smooth and help you to avoid jump cuts. Jump cuts happen when you cut from one frame to another (very similar) one without change in camera angle, subject or focal length.
Jump cuts are sometimes used by vloggers and influencers as a way of breaking up a speech to camera. However, if it's not a stylistic choice, underpinned by snappy dialogue (say, a jump-cut to a side thought), it tends to look clunky and unpolished.
Instead, look for opportunities to blend your cuts in more creative ways.
Find creative ways to mask awkward cuts
There are two obvious ways to approach an unintended jump cut - cut-in or cut-away.
Cut-in shots reveal details in the scene. They usually follow a medium shot, and take the form of an extreme close up. Depending on what would be most interesting to your viewers, this could either be of somebody's face (reaction shot!) or hand gestures, a product detail, or scene. Alternatively, you could pan all the way out to a wide-shot.
Cut-away shots take you out of the scene. This is a good way to use b-roll to bridge your shots.
B-roll
B-roll is used to fill space between shots, and provide greater context. It's an opportunity to illustrate your point in a more abstract way. Create a list of ideas and mark them off as you go.
You could also get footage for future productions.
Strive for shot variety
Avoid shooting too much of one type of shot. If you can film a variety, using different framing or camera angles, you'll add more interest to your visuals. This will keep your viewers more engaged with the story you are telling. Contrasting shots can can also be used for the cut-in transitions I mentioned earlier.
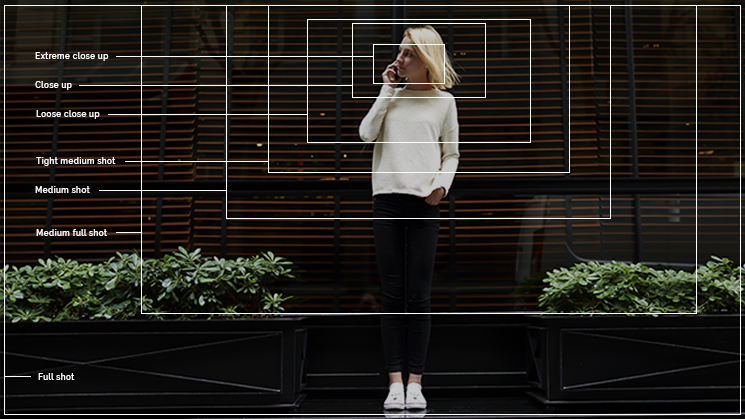
Examples of various camera shots.
Teach your performer how to speak for video
This technique is especially useful for unscripted content, like an interview. Interview formats are great for customer testimonials, meet the team videos or hero videos. Speakers should be encouraged to incorporate your questions into the answers they give. Comments, reactions and statements should ideally make sense on their own. That way, the interviewer can easily be lifted out of the conversation. This shortens the video and creates a more robust narrative.
For example, if I were to ask a question like "What do you like most about this product?" a well-constructed answer for video might sound something like "The thing I like most about this product is how easy it is to use."
Independent statements are easier to cut around. They also lend themselves more to video previews, and promotion, like the short clips you might share on social media. So, try to make your dialogue more snippet friendly. Shape your thoughts into smaller chunks of information that make sense without the wider context of what you said 2 minutes ago.

Thumbnail prep
What is the thumbnail for your video going to be? Do you want to show an establishing shot of an interesting scene, a fantastic product detail, or the friendly face of your speaker?
Identify thumbnail opportunities while you're on set and you won't be left tearing your hair out. Otherwise, you might find out too late that your most beautifully composed shots are blurry because the camera was in motion, or that your speaker is blinking in all of their most smiley clips!
Being mindful of these things, and envisioning the final cut while you are on set will help to make your entire filmmaking process much more efficient.

